SECTION 4 DEPOSIT ACCOUNTING SYSTEM
![]()
The BANCADO Deposit Account System maintains records for Checking, Savings, Club, and N.O.W. accounts. Features of the system include:
·
Variable
interest rate calculations based on account type.
·
Variable
service charge calculations based on account type.
·
Automated
proof and transit operations.
·
Automated
General Ledger update from proof entry.
·
Up
to seven day float calculation.
·
Cycled
account statements.
·
Overdraft
and Return check notices.
·
Complete
account and summary reporting by account type, office or branch, and customer.
·
Function
Selection
When the Deposit Accounting system is selected from the BANCADO main menu, the following screen is displayed:

The Deposit Accounting file contains one record for each deposit account processed by the bank. A deposit account record consists of fields of data items designed to describe a deposit account. The fields and the valid contents of each data item are as follows:
·
CUSTOMER
NUMBER
This
field contains the customer number. It
is a ten-character alphanumeric field.
Many users employ a single alphabetic character followed by a 4 or 5
digit number.
·
OFFICE
This is a two-digit field that contains the office or branch number.
·
TYPE
This is a two-digit field that identifies the type of deposit account. Valid values are 0 through 99; however, the valid types for each bank are determined by the presence of account type control records described in Section 4.3.
·
RESTRICTION
This field contains a two-digit code that identifies any restrictions on this account. The restriction code is established by your bank for such things as two signatures required or pledged as collateral for loan.
·
OPENING
DEPOSIT
This is a 12-digit field that contains the amount of the opening deposit. The maximum dollar value is 999999999.99.
·
FLOAT
DAYS
This is a one-digit field identifying the number of float days for the opening deposit. The maximum is seven days.
·
HOLD
AMOUNT
This is a ten-digit field that contains the amount of the account balance to be held for collateral or collection. The maximum dollar value is 9999999.99.
·
RELEASE
DATE
This is a ten-character field that contains the date on which the hold amount is automatically terminated. The date is entered in the form MM/DD/YYYY. This field is only required when there is a hold amount.
·
DATE
OPENED
This is a ten-character field that contains the date on which the deposit account was opened. The date is entered in the form MM/DD/YYYY.
·
OVERDRAFT
LIMIT
This is a 12-digit field that contains the overdraft limit. The maximum dollar value is 999999999.99.
·
OVERDRAFT
LOAN
This field contains the number of the loan account used to cover an overdraft.
·
STATEMENT
CYCLE
This field contains a two-digit code that determines ehn a statement is to be printed.
·
LEGAL
TITLE LINE 1
This field is 35 alphanumeric characters and contains the legal title for this deposit account. This field is required only when the legal title is different from the CIF name. If a legal title is present, the system substitutes the legal title for the Customer Name on checks, statements, and notices printed for this account.
·
LEGAL
TITLE LINE 2
This field is 35 alphanumeric characters and contains any additional legal title information.
·
CALL
CODE
This field contains a five-character code that identifies the appropriate Federal Reserve call code (Call Report line number) for this account.
The BANCADO Deposit Account system uses control records to determine certain processing options and parameters established by your bank. These control records are:
·
Bank
Name and Address - Includes certain processing options.
·
Accrual
Date - Dictates interest accruals.
·
Bank
Totals - Maintains running totals of activity.
·
Transaction
Codes - Maintains running totals by transaction type.
·
Account
Type Control - Establishes interest payment and service charge parameters.
·
Proof
Pocket Control - Establishes General Ledger accounts and float posting
allowances.
The Change Bank Control portion of the Deposit Account system provides the functions required to maintain these control records. These maintenance functions are described in the following subsections.
Function Selection
Throughout this section you will be asked to select a particular function from the CONTROL RECORD MAINTENANCE menu, which is accessed by entering 96 from the Deposit Account menu. The following example illustrates the CONTROL RECORD MAINTENANCE menu.

4.3.1 CHANGE
BANK NAME AND ADDRESS
This program establishes the name and address of the bank to be displayed on report headings and also specifies certain bank processing options.
From the CONTROL RECORD MAINTENANCE menu, enter 1 for Change Bank Name and Address. The system displays the prompt:
Enter Password: [ ]
Enter your password and press <Enter>. The system displays the bank name and address information. This information can be modified.
The system then allows you to enter any passwords that are required.
The following screen is a sample of the information displayed:

The procedure changes the accrual dates in the
system control record. This procedure is only used at installation time prior
to entering accounts and transactions for first day processing.
|
|
From the CONTROL RECORD MAINTENANCE menu, enter 2 for Change Accrual Date. The system displays the screen:
LAST BUSINESS DATE: MM/DD/YYYY [ ]
NEXT BUSINESS DATE: MM/DD/YYYY
The dates that are displayed are the current dates that exist in the system control record. To change the last business date, perform a DELETE to position to the beginning of the field. Then enter the correct date in MM/DD/YYYY format.
To change the next business date, perform a DELETE again to position to the beginning of the field. Then enter the correct date MM/DD/YYYY format.
The system displays the prompt:
ARE YOU SURE? [ ]
If your entries are correct, enter YES and press <Enter>. The system displays the message CHANGED momentarily and then returns to the Deposit Account menu.
NOTE: This procedure only changes the dates in the control record, not the current active date in the system. To change the active system date, you must return to the BANCADO main menu (99) and then return to the Deposit Account system.
To terminate the procedure without changing the dates, press <Enter> only. The system returns to the Deposit Account menu.
This program establishes the totals for all deposit accounts on file. Because the totals are normally maintained through normal transaction processing, no adjustment should be necessary after initial installation of the system. This program should be used only with direction from your BANCADO System Support representative.
From the CONTROL RECORD MAINTENANCE menu, enter 3 for change Bank Totals. The system displays the bank totals. The following screen is a sample of the display:

4.3.4 CHANGE
TRANSACTION CODES
This program establishes the descriptions for all deposit account transaction codes.
From the CONTROL RECORD MAINTENANCE menu, enter 4 for Change Transaction Codes. The system displays each of the transactions available, one at a time. To accept the description displayed as correct, press <Enter>. Otherwise backspace and enter the appropriate description.
The following screen is a sample of the display:

4.3.5
CHANGE ACCOUNT TYPE CONTROL RECORDS
This program establishes the descriptions, interest payment options, and service charge parameters for the various deposit account types.
From the CONTROL RECORD MAINTENANCE menu, enter 5 for Change Account Type Control Records. The system displays the following screen:

Enter 1 to edit interest calculation parameters, 2 to edit service charge calculation parameters, or 3 to display a history of interest rate changes.
If you select 1 to edit interest calculation parameters, the following screen is displayed:

Enter the code number for the account type you wish to establish or change and press <Enter>. If the account type control record is on file, the system displays the parameters already established and allows you to edit them one at a time. Otherwise, enter the parameters according to the format shown on the screen.
The following display is a sample of the completed screen.

4.3.6 CHANGE
PROOF POCKET CONTROL RECORDS
This program establishes the descriptions, float days, and General Ledger account numbers for the various proof posckets.
From the CONTROL RECORD MAINTENANCE menu, enter 7 for Change Proof Pocket Control Records. The system displays the following screen:

Enter the pocket number for the pocket you wish to establish or change and press <Enter>. If the proof pocket control record is on file, the system displays the data fields already established and allows you to edit them one at a time. Otherwise, enter the parameters according to the format shown on the screen.
The following display is a sample of the completed screen:
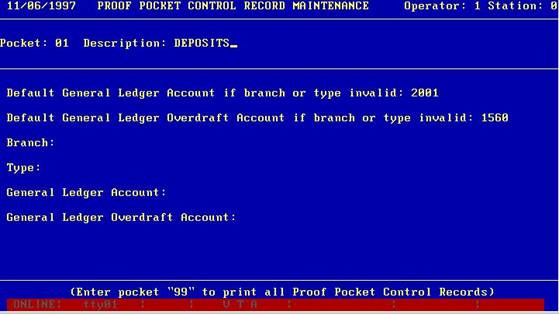
Note that for some of the pockets, you may
enter both a default set of general ledger account numbers and a different set
for each individual branch and/or type.
The Deposit Account Activity procedures provide functions to:
·
Enter
new deposit accounts into the system.
·
Change
existing deposit accounts.
·
Post
deposit account transactions.
·
Review
the current status of a deposit account at any time.
·
Enter
and change stop payments.
·
Perform
year-end maintenance.
·
Proof
entry of deposits.
·
Post
proof items.
·
Clear
proof files.
·
View
proof pocket totals.
·
View
account type totals.
Function Selection
Throughout this section, you will be asked to select a particular function from the Activity portion of the Deposit Account menu. The following is an example of the Activity portion of the menu:
DEPOSIT ACCOUNT ACTIVITY
New Account
Change Account
Transaction
Activity Summary
New/Change Stop Payment
Year-End Maintenance
Proof Entry
Post Proof Items
Clear Proof Files
Proof Pocket Summary
Account Type Summary
4.4.1 NEW ACCOUNT
This procedure is used to enter a new deposit account into the system.
From the Deposit Account menu, enter 9 for New Account. The system displays the prompt:
Customer Number: [ ]
Enter the customer number and press <Enter>.
The system displays the customer information and lists all the customer's accounts. The following sample illustrates this display.
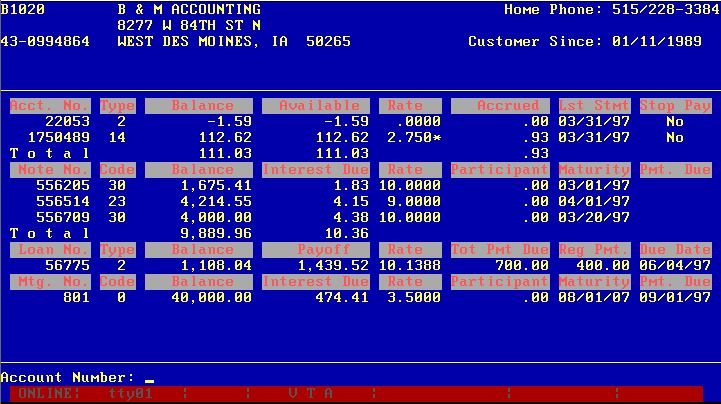
The system then prompts:
Account Number: [ ]
Enter the new account number. The system then displays:
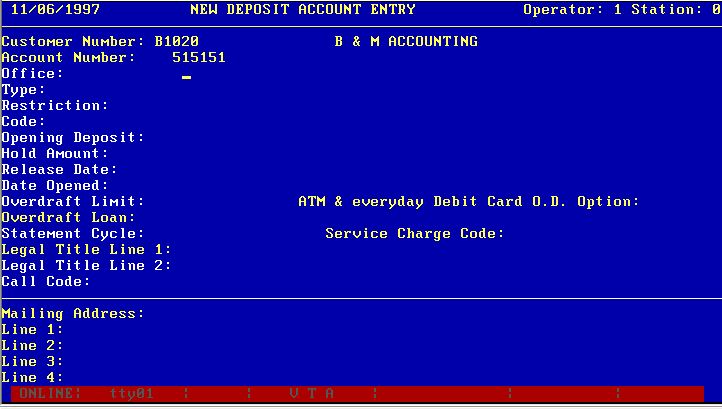
Enter data in each field of the Deposit Account record according to the definitions given in Section 4.2, Deposit Account File. Table 4.1 summarizes the data in the deposit account record.
After entering the data in each field, press <Enter> and the system positions to the next prompt. To skip an optional field, press <Enter> only. If you make an error during new account entry, you may back up one field at a time by performing a CANCEL operation.
Table 4.1 Deposit Account Record Summary
|
Field Number |
Field Name |
Field Type |
Field Length |
|
1 |
CUSTOMER NUMBER |
ALPHANUMERIC |
10 |
|
2 |
OFFICE |
NUMERIC |
2 |
|
3 |
TYPE |
NUMERIC |
2 |
|
4 |
RESTRICTION |
NUMERIC |
2 |
|
5 |
OPENING DEPOSIT |
NUMERIC |
12 |
|
6 |
FLOAT DAYS |
NUMERIC |
1 |
|
7 |
HOLD AMOUNT |
NUMERIC |
10 |
|
8 |
RELEASE DATE |
ALPHANUMERIC/DATE |
10 |
|
9 |
DATE OPENED |
ALPHANUMERIC/DATE |
10 |
|
10 |
OVERDRAFT LIMIT |
NUMERIC |
12 |
|
11 |
OVERDRAFT LOAN |
ALPHANUMERIC |
10 |
|
12 |
STATEMENT CYCLE |
NUMERIC |
2 |
|
13 |
LEGAL TITLE LINE 1 |
ALPHANUMERIC |
35 |
|
14 |
LEGAL TITLE LINE 2 |
ALPHANUMERIC |
35 |
|
15 |
CALL CODE |
ALPHANUMERIC |
5 |
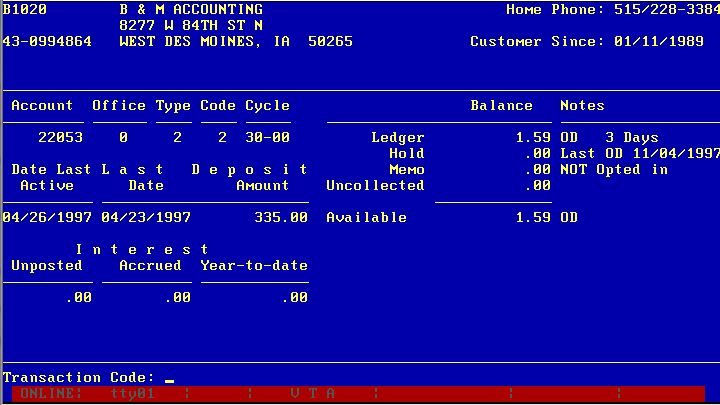
After you enter the last field in the Deposit Account record, the system allows you to enter a transaction. The customer information and account information are displayed as well as the prompt:
Transaction Code? [ ]
To change customers, press <Enter> only. To return to this customer=s CIF display, enter 999 and press <Enter>. To enter a transaction, refer to Section 4.4.3 for a description of transaction entry. The following sample illustrates the information displayed on the screen.
This procedure is used to change information for an existing deposit account. This procedure can also be used to view the data defined for a deposit account.
From the Deposit Account menu, enter 10 for Change Account. The system displays the following prompt:
Customer Number: [ ]
Enter the customer number and press <Enter>. If you do not know the customer number, press <Enter> only. The system then prompts:
Account Number: [ ]
If the customer number is specified and there is only one deposit account for the customer, the system displays the deposit account record. Otherwise, the system waits for entry of the deposit account number.
The following screen is a sample of the Change Account display:
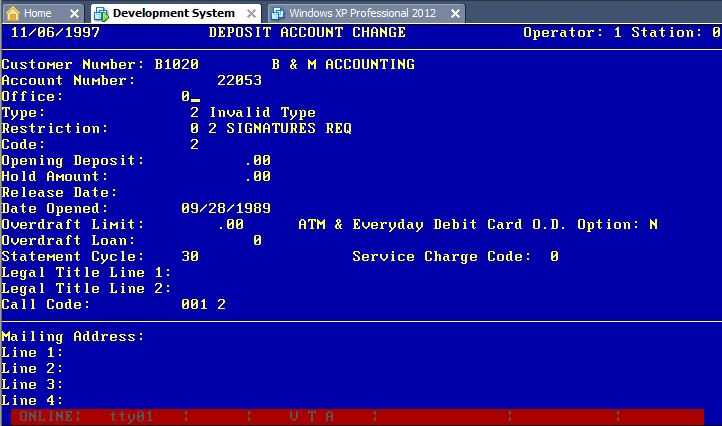
You can position to each field and change the existing data according to the definitions given in Section 4.2. Correct fields can be skipped by pressing <Enter> only. After accepting or changing the last item (Call Code), the system requests another customer and/or deposit account number to be changed. Perform an ESCAPE to terminate the Change Account procedure and return to the Deposit Account menu.
This procedure is used by bank is not using proof entry to enter transactions that are posted to deposit accounts and stored in the Transaction file. The Transaction file is then used to print the Transaction Journal and to prepare Customer Ledgers, Notices, and Statements.
This procedure performs a variety of functions based on the specified transaction code. The Deposit Account transactions are:
Code Transaction
20 Opening Deposit Reversal
(Deletes Account Record)
30 Deposit Reversal
31 Credit Reversal
40 Deposit
41 Miscellaneous Credit
50 Withdrawal
51 Miscellaneous Debit
60 Withdrawal Reversal
61 Debit Reversal
71 Extra Interest Payment
80 Interest Payment Reversal
From the Deposit Account menu, enter 11 for Transaction. The system displays the prompt:
Customer Number: [ ]
Enter the customer number and press <Enter>. You can press <Enter> only to enter the transaction by account number.
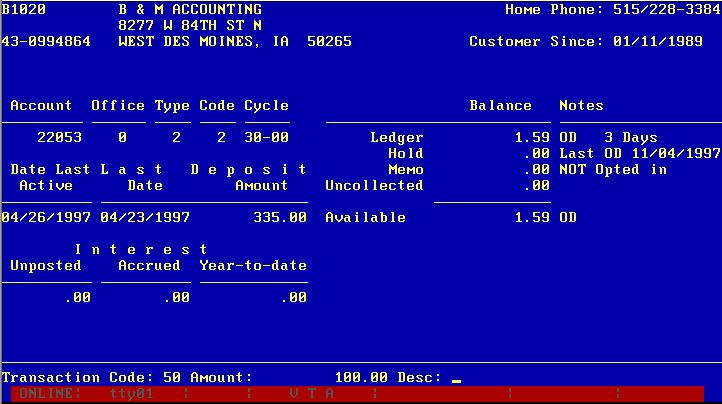
When a customer number is entered, the system displays the customer information. If only one account exists for this customer, the system requests the transaction code without requesting the account number. Otherwise, the system displays the prompt:
Account Number: [ ]
You may key the account number for one of the deposit accounts shown on the screen and press <Enter> or you may press the up and down arrow keys to select either a deposit account or a loan or CD account shown. If you select an account other than a deposit account, the system switches to that application to display the account. For deposit accounts, the system displays the deposit information first as shown in the following sample display:
The system then displays the prompt:
Transaction Code: [ ]
Enter the desired transaction code and press <Enter>. At this point, two other options are available:
1. To enter a transaction for a different account for this customer, enter 99 and press <Enter>. The system returns to the customer display and requests another account number.
2. To enter a transaction for another customer, press <Enter> only. The system clears the screen and displays the Customer Number prompt.
After the transaction code is specified, the system displays a series of prompts. The prompts that are displayed depend on the specified transaction code. The following screen is a sample of the display.
This procedure is used to view the current status of deposit account activity. This procedure displays a list of all the various transaction types and shows the number and amount of each transaction type entered thus far today and for the previous day. Also, the display shows the balances (overdrafts, positive, net accrued interest, and year-to-date interest) as of the last transaction and as of the last close of business.
From the Deposit Account menu, enter 12 for Activity Summary. The system automatically displays the activity summary on the screen, as follows:
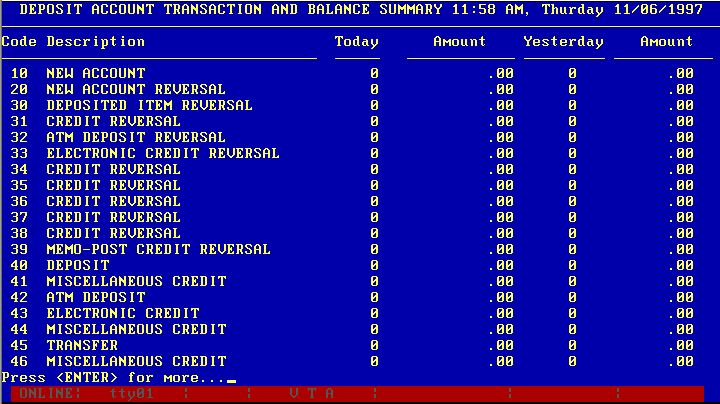
After viewing the Activity Summary screen, press <Enter> to return to the Deposit Account menu.
This program provides for the maintenance of stop payment records.
From the Deposit Account menu, enter 13 for New/Change Stop Payment. The system displays:
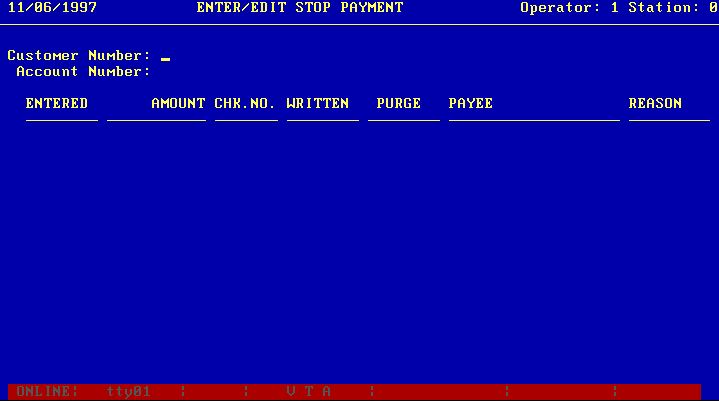
Enter the customer number, if it is known, and press <Enter>. If you do not know the customer number, press <Enter> only; the system positions to the Account Number prompt.
If the customer number is specified and there is only one deposit account for the customer, the system displays any stop payments on file for the account and proceeds to the Enter Option prompt. Otherwise, the system waits for entry of an account number.
The system displays any stop payments on file and then displays the prompt:
Enter Option: [ ]
The following are valid option codes:
<Enter> - Change customers
1 - Add new stop payment for this account
2 - Delete stop payment
3 - Change existing stop payment
4 - Next page of stop payments
<Esc> - Terminate procedure and return to Deposit Account menu
Change Customers
If you press <Enter> only, the system returns to the Enter/Edit Stop Payment display for you to enter a new customer.
Add New Stop Payment
If you enter a 1, the system allows you to enter a new stop payment and returns to the Enter Option prompt. For a new stop payment, enter the following data:
|
ENTERED |
Enter the date that the Stop Payment was entered into the system in the form MM/DD/YY. This is a required field. |
|
AMOUNT |
Enter the amount of the check to be stopped. The maximum dollar value is 9999999.99. This is a required field. |
|
CHK.NO. |
Enter the customer=s check number for the item to be stopped in the form 999999. This is an optional field. |
|
PURGE |
Enter the date that the stop payment is to be automatically removed from the system in the form MM/DD/YY. This is a required field. |
|
PAYEE |
Enter the name of the payee on the item to be stopped. This field can be 20 alphanumeric characters. This is an optional field. |
|
REASON |
Enter the reason that the stop payment was requested, lost, or stolen. This field can be six characters. This is an optional field. |
Delete Stop Payment
If you enter a 2, the system displays:
ENTER LINE NUMBER TO DELETE: [ ]
Press <Enter> to return to the Enter Option prompt or enter the line number, which is displayed at the left of the screen, of the stop payment you wish to delete. After deleting the record, the system allows you to enter another option code.
Change Existing Stop Payment
If you enter a 3 in response to the Enter Option prompt, the system displays the prompt:
ENTER LINE TO CHANGE: [ ]
Enter the line number displayed at the left of the screen of the stop payment you wish to change. The system positions to each field of the stop payment allowing you to backspace and enter the correct data; press <Enter> only to skip correct fields.
Next Page of Stop Payments
If you enter a 4 to the Enter Option prompt, the system displays the next page of stop payments on file for the account and returns to the Enter Option prompt.
This procedure clears the year-to-date interest field in all deposit account records. You may wish to make a special backup before proceeding.
From the Deposit Account menu, enter 14 for Year-end Maintenance. The system displays the screen:
YEAR
END MAINTENANCE
Press <Enter> to proceed: [ ]
If you wish to proceed, press <Enter>. During the procedure, the system displays the message:
Clearing Year-to-date Figures
When complete, the system returns to the Deposit Account menu.
This procedure provides the capability to use each BANCADO terminal as a proof machine. The features of the program include:
- Automatic transaction
balancing
- Account number verification
for on-us items.
- Optional batch or
teller totals.
- Capabilities to
change, delete, or insert transactions.
- Multiple postings to
accounts from proof throughout the day.
Use of the Proof Entry function requires that proper Proof Pocket Control Records be established as described in Section 4.3.
From the Deposit Account menu, enter 15 for Proof Entry. The system displays the prompt:
Do you wish to enter check numbers/descriptions? (Y/N): [ ]
Enter a Y if you wish the system to request a check number or description for on-us debits and credits or enter an N if you do not. Any check number or description entered for an on-us item appears on the customer statement. Note that the system requests a description for all General Ledger, Certificate of Deposit, and Loan transactions regardless of the response to this prompt. The system then displays the prompt:
Do you wish to access another station=s files? (Y/N): [ ]
If you wish to work with proof items entered from another terminal, enter Y. Otherwise, enter N. Entry of a password may be required if a Y is entered. If an N is entered, the system displays the Proof Entry form. If a Y is entered, the following prompt is displayed:
Station Number: [ ]
Enter the required station number and press <Enter>. If proof entry is not permitted from the station, the following message is displayed:
Proof Operations not permitted from station nn
nn is your station number. If this message appears and you feel you are using a valid number, contact your BANCADO System Support representative.
The following screen is a sample of the Proof Entry form.

The system is positioned to the prompt:
Batch/Teller: [ ]
If your institution is maintaining separate General Ledger cash accounts for each teller, enter the assigned teller number for the items to be processed. (The teller number is defined in the Proof Pocket Control Record.) Otherwise, enter any batch number you wish to use.
for each item to be processed, the system requests the following fields as required:
Pocket -- The pocket (or special code) as described at the bottom of the form. The pocket numbers 1n, 2n, and 3n indicates that for General Ledger and non-on-us items, you may use posckets 10 through 19, 20 through 29, and 30 through 39 respectively.
Sequence -- The system assigned sequence number for the item. This field is manually entered only when changing, deleting, or inserting an item. On proof reports, the sequence number is a part of the trace number printed in the format SSBBBB-nnnnn-nn where SS is the station number, BBB is the batch or teller number, and nnnnn-nn is the assigned sequence number.
Account -- The customer or General Ledger account number for this item. This field is requested only if required for the item.
TC -- Transaction code, which is required only for deposit account items. The normal code for checks (withdrawals) or for deposits, depending on the pocket selected, is displayed. To accept the code displayed, simply press <Enter>. Otherwise, key the appropriate debit or credit code and press <Enter>.
Amount -- The amount of the item, entered without a decimal point. After the amount has been entered, it is redisplayed with a decimal point inserted before the last two digits entered. For example, 100 is displayed as 1.00.
Check Number/Description -- The check number or description of the item. During item entry, the CANCEL operation can be performed once to cancel an item or twice to return to the Batch/Teller number prompt.
The special codes used in lieu of the pocket number function are as follows:
90 - Toggle Help -- Shows these special codes.
91 - Scan for Errors -- Scans the batch looking for items with errors.
92 - Page Back -- Returns to the previous page of the batch.
93 - Page Forward -- When editing an existing batch, entry of 93 causes the
next page to be displayed.
94 - Next Batch -- Returns to the Batch/Teller number entry.
95 - Add Entry -- Requests a sequence number for insertion of an item. The
system automatically assigns a sequence number with a suffix of 01 to 99 for
inserted items.
96 - Change Entry -- Requests the sequence number of the item to be changed.
Each field in the requested item is displayed one at a time to allow the
operator to backspace and make corrections.
97 - Delete Entry -- Requests the sequence number of the item to be
deleted.
98 - Delete Batch -- Displays the prompt Are You Sure (Y/N): in case 98 was
keyed in error. Press Y and <Enter> to delete the entire batch or N and
<Enter> to cancel the request.
99 - Batch Total -- Displays the current credit total of the batch and the
amount that debits are long or short of the credit total. This code can be used
as often as necessary during item entry for balancing purposes.
Each transaction, which can consist of any number of items, is automatically balanced during proof entry. This is accomplished by requiring that credit items be entered first, followed by the offsetting debit items. If an attempt is made to enter a credit transaction after a debit transaction and the previous debits did not balance to the prior credits, the system will reject the entry. As a visual display of separate transactions, the system skips a line each time the debit and credit accumulators are in balance. The following screen is a sample display:
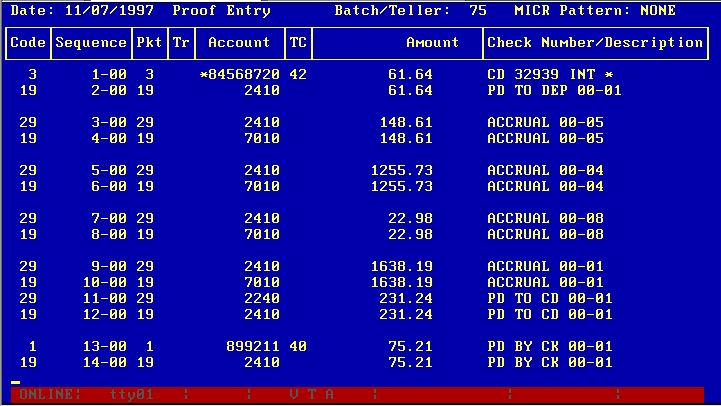
To terminate the proof entry operation, perform the ESCAPE function.
This procedure is used to post the items entered through proof entry (see Section 4.4.7). Items are posted to deposit accounts and to the General Ledger. This procedure can be run several times per day.
NOTE: It is recommended that a backup be performed before this procedure is executed. If this procedure is terminated during execution, you must recover from backup and restart.
From the Deposit Account menu, enter 16 for Post Proof Items. The system displays the following screen:
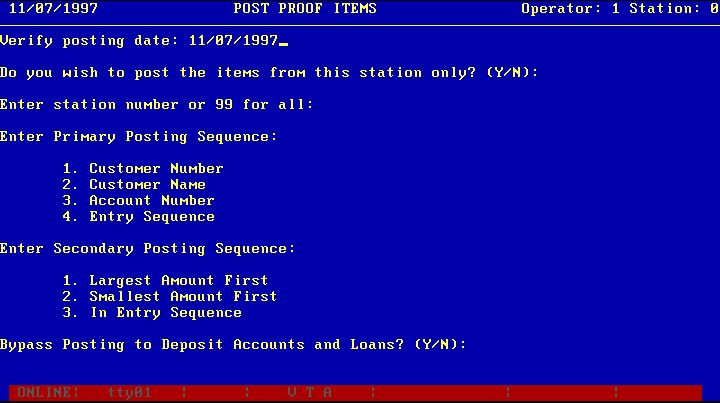
If you wish to post only the items entered through the station you are currently using, enter Y and press <Enter>. Otherwise enter N and press <Enter>.
If you responded with an N to the first prompt, the system waits for you to enter the station number to posted. To post the items from all stations, enter 99. Otherwise, enter the station number.
The system positions the cursor to the Enter Posting Sequence prompt and waits for your reply. Enter the number that corresponds to the desired sequence and press <Enter>.
The system posts all deposit account items entered via proof entry to the appropriate accounts while listing the items.
Upon completion of the posting of the deposit account items, the system posts the float amount contained in deposits if your bank has chosen this option (see Section 4.3). If your bank is using the BANCADO General Ledger system, the system then creates the appropriate General Ledger entries.
SAMPLE PROOF TRANSACTION POSTING REPORT
SAMPLE GL TRANSACTIONS FROM PROOF REPORT
Because proof transactions can be posted several times during the day, the proof posting program does not remove posted items from the proof files. Posted items are flagged as posted but are retained on file so that the proof list of the work for the entire day can be printed. At the beginning of each day, the proof files must be cleared using this program.
From the Deposit Account menu, enter 17 for Clear Proof Files. The system displays the prompt:
Enter station number or 99 for all: [ ]
Enter the number and press <Enter>. The system displays one of the following messages, depending on the operator's selection:
Clearing proof files for station nn... (where nn is the proof station number)
Clearing proof files for all stations...
When complete, the system displays a proof batch
summary as described in the next section so that
the operator can verify that the proper files have been cleared.
This program is provided so that Proof Batch and Pocket totals may be quickly viewed at any time without printing all proof entry detail.
From the Deposit Account menu, enter 18 for Proof Pocket Summary. First, the operator is asked to select a range of batches to be included. For all batches, simply press <Enter>. Otherwise key the low batch number required, press <Enter>, key the high number required, and press <Enter>. Then enter a "B" for a Batch Summary or a "P" for a Pocket Summary at the next prompt. At the Display or Print prompt, enter a "D" for Display or "P" for Print. If you have requested a Pocket Summary, the system will next ask if you want to combine general ledger debit and credit pockets and non-on-us pockets. Respond with an "N" to see a single total for each or with a "Y" to see totals for each individual pocket. The system displays the message PROCESSING momentarily and the Proof Batch or Proof Pocket Summary is displayed. The following screens are examples of the displays.

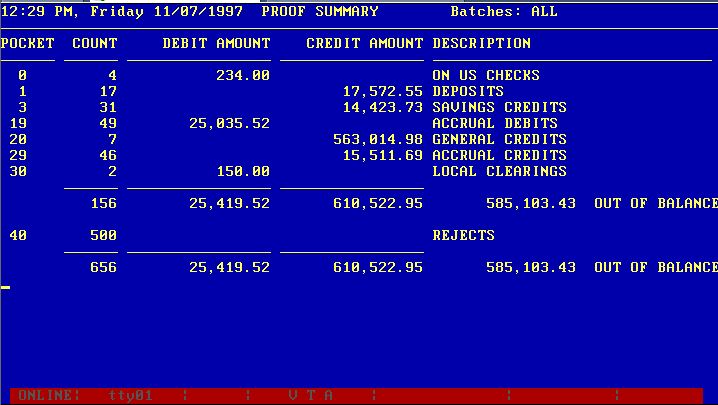
Press <Enter> to display the Deposit Account menu.
This program is provided as a quick check of totals by deposit account type to be used when the account detail shown on the trial balance and other reports is not required.
From the Deposit Account menu, enter 19 for Account Type Summary. The system will display the following prompt:
Enter P-Print or D-Display: [ ]
If you wish to print the summary, enter P and press <Enter>. If you wish only to display the information on the screen, type D and Press <Enter>.
The system next requests the primary sort sequence, either Type or Code. Enter a T for Type or a C for Code and press <Enter>.
The system then asks for a secondary breakdown option. To show sub-totals for each type or code within branch or for each branch within type or code, key the appropriate breakdown number. To establish predetermined sub-total points within type and/or code, select option 6, Set Subtotals.
After the secondary breakdown option has been entered, the system momentarily displays the message PROCESSING and the Account Type or Account Code Summary is displayed. The following screen is an example:
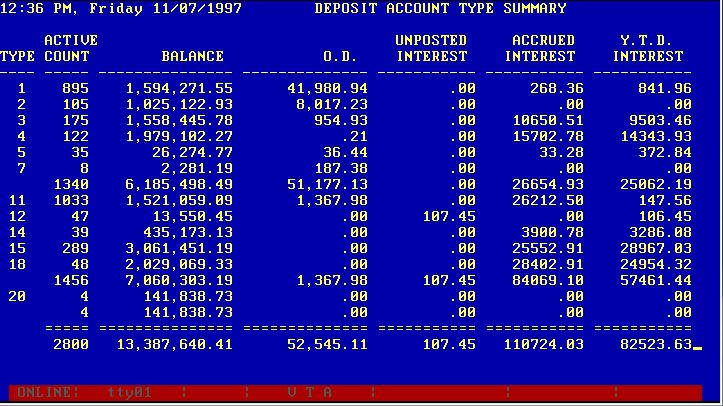
Press <Enter> to display the Deposit Account menu.
The Deposit Account system produces a variety of reports. Most reports can be printed on an optional basis, with the exception of the Transaction Journal. The Transaction Journal must be printed as an update run at the end of each day after all activity has been entered. When this report is printed as an update, the system date is advanced and the necessary interest calculations are made.
Function Selection
Throughout this section you will be asked to select a particular function from the Reports portion of the Deposit Account menu. The following is an example of this portion of the menu.
REPORTS
Transaction Journal
Trial Balance
Closed Account List
New Account List
Call Report
Overdraft Lists
Stop Payment Lists
Proof Lists
Service Charge List
Check Register
Transaction Exceptions
Change Print Size
This report is a journal of the transactions entered for the current day. Optionally, this procedure updates the interest accrual for the day in the Deposit Account file.
Normally, a Transaction Journal is printed once
each day, and at least one run per day is required for proper interest accrual.
Because the file update portion of the procedure is optional, a Transaction
Journal can be produced without the update option at any time during the day to
indicate the current status of transaction activity for the day.
NOTE: If the Transaction Journal
program with the update option is terminated for any reason prior to normal
completion, you must recover from backup before restarting. It is
therefore important that a backup procedure be performed prior to beginning an
update run.
From the Deposit Account menu, enter 20 for Transaction Journal.
If the system date is not the same as the next scheduled accrual date, the system starts to print the Transaction Journal and displays the Deposit Account menu.
When the system date is the correct accrual date, the system displays the prompts:
Today=s
Date: MM/DD/YY Next Working Date:
Is this an update run? (Y/N): [ ]
Update run
To accrue interest for the day, enter Y and press RETUIRN. The system positions to the Next Working Date prompt.
Enter the next date the bank will be open. (If you have created a bank calendar for the year using the program B/CAL, the next working date from the calendar is automatically displayed.) The system then determines the number of days for which interest is to be accrued.
To cut off a month, quarter, or year in the middle of a weekend, you can run a separate update for the portion of the weekend after the cutoff in order to obtain an accurate cutoff on accruals. With the advent of Truth-in-Savings regulations, it is common to run a single-day update on days when interest is paid and when statements are printed so that interest is not paid in advance, thus confusing the APY disclosure shown on statements.
The system displays the prompt:
Enter Account types on accrual to be paid interest today: [ ]
Account types coded for daily interest payment are automatically credited with interest daily. Those coded for daily accrual (see section 4.3.5) are credited only on those days when those accounts are entered in response to this prompt. For example, if type 1 accounts are to be paid interest monthly and type 2 accounts are to be credited quarterly, the response to this prompt during the month would be <Enter> only, at month-end would be 1 and <Enter>, and at the end of the quarter would be 1,2 and <Enter>. Enter the type codes for any accounts to be credited with interest today separated by commas and press <Enter>.
The system displays the prompt:
Do you want to include proof transaction detail on the journal? (Y/N): [ ]
If you have entered and posted items through the proof entry function, you already have transaction posting journals for those items, so the transaction journal program allows you to include summary totals of those items in lieu of another detail list. Enter a Y to include all items entered through proof in detail or an N to report only proof totals.
The system displays the screen:

Enter the number that corresponds to the desired sequence and press <Enter>.
The system prints the Transaction Journal and displays the Deposit Account menu.
Print-Only Run
To print the Transaction Journal without updating the accruals, enter N in response to the prompt:
Is This An Update Run? [ ]
The system starts to print the report and displays the Deposit Account menu.
SAMPLE TRANSACTION
JOURNAL
This report prints a trial balance of all outstanding deposit accounts. The trial balance can be generated in the following sequences:
o By Customer Number
o By Account Number
o By Customer Sort Key
o By Office (Branch)
o By Type
o By Code
Bank totals are printed at the end of the report. For reports that are printed in customer number or name sequence, totals are printed for each customer.
Normally, a trial balance is printed after the Transaction Journal/Update procedure. Thus, the Trial Balance is run at the close of business each day, and the report can be saved for bank records.
Because the Trial Balance procedure does not update any disk files, the report can be printed at any time during the day. When the procedure is run prior to the Transaction Journal update run, the principal balances shown on the report are current as of the time of the run, but the interest balances are current as of the close of the preceding business day.
From the Deposit Account menu, enter 21 for Trial Balance. After selection of 21, the system requests the sequence in which to print the report, as follows:
|
Active Accounts By: |
All Accounts By: |
|
1. Customer Number |
7. Customer Number |
|
2. Account Number |
8. Account Number |
|
3. Sort Key |
9. Sort Key |
|
4. Office |
10. Office |
|
5. Type |
11. Type |
|
6. Code |
12. Code |
Type the number of the desired sequence and press <Enter>. The system displays:
Enter Type(s) to be Included or 99 For All: [ ]
Enter the types to be included on the Trial Balance separated by commas, or enter 99 to include all types, and press <Enter>.
The system starts to print the Trial Balance in the specified sequence and displays the Deposit Account menu.
SAMPLE TRIAL BALANCE
The Closed Account report lists all accounts closed either today or this month.
From the Deposit Account menu, enter 22 for Closed Account List. After selection of 22, the system requests the time period to be reported, as follows:
Enter Code For Daily or Monthly Report (D/M): [ ]
Enter D to print accounts closed today. Enter M to print all accounts closed this month (since the last monthly report).
The system starts to print the report and displays
the Deposit Account menu.
SAMPLE
CLOSED ACCOUNT REPORT
This report lists all new accounts that were entered either today or so far this month. The operator can select the period for the printed report.
This report can be printed at any time. Normally, it is printed at the end of each business day and at the end of each month.
From the Deposit Account menu, enter 23 for New Account List. After selection of 23, the system requests which period is to be reported, as follows:
Enter Code For Daily or Monthly Report (D/M): [ ]
Enter D to list all new accounts that were processed today. Enter M for all new accounts processed this month (since the last monthly report). Press <Enter>.
The system begins printing the report and displays the Deposit Account menu.
SAMPLE NEW ACCOUNT REPORT
This report lists all deposit account totals sorted by Federal Reserve Call Code. The report includes the spread of accounts by the size.
The Call Code report can be generated whenever a request is made for the information.
From the Deposit Account menu, enter 24 for Call Report. After selection of 24, the system displays the screen:
Enter 5 call Report breaks:
1 Overdrawn
- .01
-
2 .01 -[ ]
Enter the upper limit for the first size breakdown. The maximum amount is 9999999.99. Repeat this procedure until all five size brackets have been entered. Upon completion of the entries, the system begins printing the Call Report and displays the Deposit Account menu.
SAMPLE CALL REPORT
This report lists various deposit account overdraft and float reports including:
Ø
All
Overdrafts by Customer Number
Ø
All
Overdrafts by Account Number
Ø
All
Overdrafts by Sort Key
Ø
Active
by Customer Number
Ø
Active
by Account Number
Ø
Active
by Sort Key
From the Deposit Account menu, enter 25 for an Overdraft List. The system displays the screen:

Enter the number of the report and sort options you wish and press <Enter>.
The system starts to print the overdraft list in the specified format and sequence and displays the Deposit Account menu.
SAMPLE OVERDRAFT REPORT
This report prints a list of stop payments. The report can be generated in the following sequences.
![]() Stop Payment
Suspects by Customer Number
Stop Payment
Suspects by Customer Number
![]() Stop Payment Suspects by Account
Number
Stop Payment Suspects by Account
Number
![]() Stop Payments Suspects by Sort
Key
Stop Payments Suspects by Sort
Key
![]() Complete Stop Payment List by
Customer Number
Complete Stop Payment List by
Customer Number
![]() Complete Stop Payment List by
Account Number
Complete Stop Payment List by
Account Number
![]() Complete Stop Payment List by
Sort Key
Complete Stop Payment List by
Sort Key
From the Deposit Account menu, enter 26 for Stop Payment Lists. The system displays the screen:
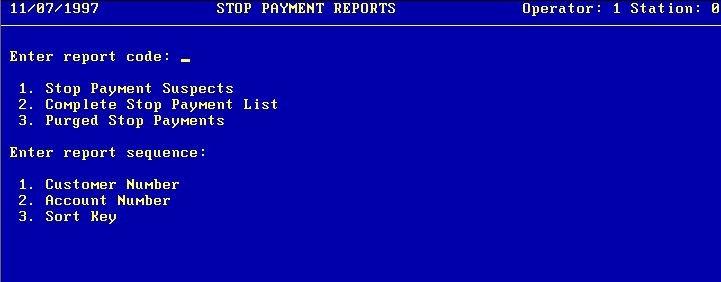
Enter the number of the sort option you wish and press <Enter>.
The system starts to print the Stop Payment List in the specified sequence and displays the Deposit Account menu.
SAMPLE STOP PAYMENT LIST
The Proof List program is used to prepare listings of items entered through the Proof Entry function. The proof items can be listed either in the sequence entered (by batch) or in the pocket distribution sequence (by pocket). The program allows the operator to select all batches, all pockets, or a range of pockets or batches to be listed.
From the Deposit Account menu, enter 27 for Proof List. The system displays the screen:
PROOF LISTING
Enter Sequence: [ ]
1. Batch
2. Pocket
Enter the number of the desired sequence and press <Enter>. The system displays the prompt:
Batches (or Pockets)
From: [ ] Through:
If all batches or pockets are desired, press <Enter> to the From prompt. If only one batch or pocket is desired, enter the batch or pocket number in response to the From prompt and press <Enter> to the Through prompt. If a range of batches or pockets is desired, enter the lowest number of the batch or pocket in the range to the From prompt and the highest number of the batch or pocket in the range to the Through prompt.
The system begins printing the requested list and returns to the Deposit Account menu.
SAMPLE TRANSIT LETTER FROM BANCADO
SAMPLE PROOF LIST BY POCKET
This report prints a list of service charges and optionally posts the calculated charges to the customer accounts. The charges are calculated in accordance with the service charge parameters on file for each account type or code as specified in Section 4.3.5.
NOTE: This report must be run with the posting option before the statements for each cycle are printed.
From the Deposit Account menu, enter 28 for Service Charge List. The system displays the screen:
Sorted By: [ ]
1. Customer Number
2. Account Number
3. Customer Sort Key
Cycles Required:
Post Charges? (Y/N):
Enter the sort sequence desired. Enter the cycles you wish printed, separated by commas, and press <Enter>.
Enter Y if you wish the services charges posted to the accounts. Enter N if you wish only a report of the service charges. Press <Enter>. The system begins to print the service charge list and returns to the Deposit Account menu.
SAMPLE SERVICE CHARGE LIST
The Check Register program is used to print a register of Club Account checks printed by the Interest Check program (Section 4.6.3). Note that the check register must be printed after the checks have been printed.
From the Deposit Account System menu, enter 29 for Check Register. The system displays the prompt:
Interest Check Date: MM/DD/YYYY [ ]
If the date shown is correct, press <Enter> to continue. Otherwise, backspace over the date shown and key the correct date in the form MM/DD/YYYY and press <Enter>.
The system begins printing the report and returns to the Deposit Account menu.
SAMPLE CHECK REGISTER
4.5.11 TRANSACTION
EXCEPTIONS
This program allows you to print various transaction exception reports.
From the Deposit Account menu, select 30 for Transaction Exceptions. The system displays the screen:
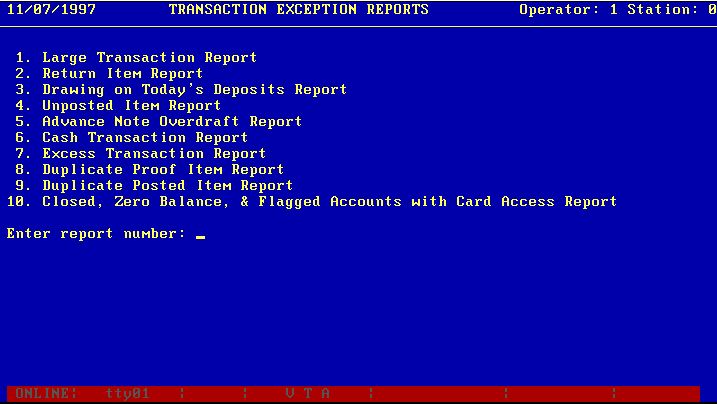
Enter the
number of the exception report desired.
4.5.12 PRINTER
CONTROL
This program allows you to set up and change various printing options in the BANCADO system.
From the Deposit Account menu, select 31 for Printer Control. The system displays the screen:
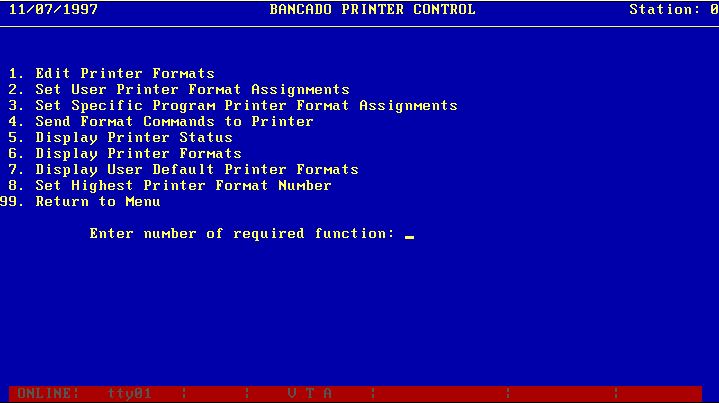
Enter the menu function you want to access and press <Enter>.
The Deposit Account system provides functions for customer notification in the form of:
![]() Detailed
account statements cycled to fit the requirements of the bank and the bank=s customers.
Detailed
account statements cycled to fit the requirements of the bank and the bank=s customers.
![]() Overdraft notices prepared on a
daily basis.
Overdraft notices prepared on a
daily basis.
![]() Interest checks for Christmas,
Vacation, and other Club Accounts.
Interest checks for Christmas,
Vacation, and other Club Accounts.
![]() Interest notice form 1099,
including all interest paid to a particular customer from savings accounts,
N.O.W. accounts, and Certificates of Deposit.
Interest notice form 1099,
including all interest paid to a particular customer from savings accounts,
N.O.W. accounts, and Certificates of Deposit.
![]() Audit Statements printed at
random for use by internal or external auditors as direct verification of
account balances.
Audit Statements printed at
random for use by internal or external auditors as direct verification of
account balances.
Function Selection
Throughout this section you will be asked to select a particular function from the CUSTOMER NOTICES portion of the Deposit Account menu. The following example illustrates the CUSTOMER NOTICE portion of the Deposit Account menu.
CUSTOMER NOTICES
40. Statements
41. Overdraft Notices
42. Interest Checks
43. 1099's
44. Imaging Utilities
45. Automatic Entries
The Statements program is used to print regularly scheduled and audit statements of checking, savings, N.O.W., and club accounts according to the cycles established by your institution. Normally, the Service Charge List Program (see Section 4.5.9) is processed immediately prior to running scheduled statements.
In addition to normal processing, this program allows for restarting in case of physical damage to printed statements, the creation of a file for subsequent microfiche and/or laser printed statements, the substitution of a simple transaction list on stock paper for actual statements, and the bypassing of the part of the program that clears the printed transactions from the file.
THE PREVIOUS PARAGRAPH IS ONLY PARTIAL AND NEEDS TO BE FIXED FOR NEW PROGRAMS PLUS A SAMPLE SCREEN NEEDS TO BE ENTERED HERE.
For special instructions regarding using multiple printers for statement preparation, printing multiple statement cycles on the same date but during separate runs, and for creating a laser/microfiche file in a sequence different from your hard-copy statements, see the notes following the operating instructions.
From the Deposit Account menu, enter 40 for Statements. The system displays the following screen.

This screen presents statement printing options that are generally static, that is they don't normally change very often. Review the options to ensure they are correct and press <Enter> to proceed to the next screen.
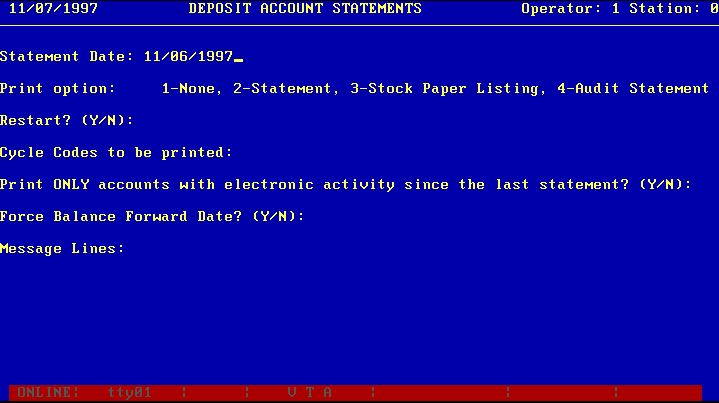
If the date displayed is correct, press <Enter> to proceed. Otherwise, backspace over the date shown and key the correct date prior to pressing <Enter>.
The default print option, 2 for statement paper, is shown. Edit the option if necessary and press <Enter>.
The system then positions the cursor after the
next prompt, Restart? (Y/N):
.If you are restarting the program and do not wish to print (or store in the microfiche/laser file) the statements that have already been printed, enter a Y. Otherwise enter an N. Press <Enter>.
If you have requested a restart, the system displays the prompt:
Restart with account number: [ ]
Key the account number of the statement you wish to start with and press <Enter>. Note: The account number you enter must have a Cycle Code equal to one which your are requesting for this statement run.
The system will then proceed to the next prompt, Cycle Codes to be printed:. Enter all cycle codes to be included in the statement run separated by commas and press <Enter>. The system proceeds to the Print ONLY accounts with electronic activity since the last statement prompt. Select Y or N.
The Force Balance Forward Date? (Y/N): option allows you to bypass the printing of transactions that have been printed on an earlier statement but are still stored in your account records. This situation can occur if you intentionally retain transactions after a statement run or because of an error in the transaction file clearing process. Under normal circumstances, you will answer N to this prompt. If it is necessary for you to respond with a Y, keep in mind that the balance forward date entered will apply to all statements prepared in this run with a balance forward date prior to the date entered. If you do respond with a Y, the system will then proceed to the prompt:
Force Balance Forward Date: [ ]
Key the date to be used as the balance forward date in the format MM/DD/YYYY and press <Enter>. If you try to select a date after the Statement Date entered above, the system will reject it.
Normally, the BANCADO system will show a customer's total Savings Account and total Certificate of Deposit balance at the bottom of any deposit account statement for the customer. As an option, you may replace the two lines where those balances would appear with any two-line message you wish. Key the two lines of the message and press <Enter> after each one. The computer will automatically center each line in the message area on the statement, so do not attempt to center the message as you are keying it.
If you are printing Audit Statements, the system will ask for 2 percentages, the first for the percentage of the number of accounts to be included and the second for the percentage of account balances to be included. Both percentages will be met. The system also gives the option of having accounts with a balance over a specified amount included automatically. After all options have been entered, the system will display the prompt:
Are all entries OK? (Y/N): [ ]
If you have chosen all options the way you want them, key a Y and press <Enter>. If you wish to change any of the options, key an N and press <Enter> to restart at the beginning. Once you have approved all of the options, the system begins the sorting and merging process required for preparing the statements in the sequence selected. During this phase, the system displays the message Sorting . . . followed by the message Merging . . ..
If you have selected print option 2 or 4 to print on statement forms, the system next prints a sample form and displays the following prompt:
Is the form aligned OK? (Y/N): [ ]
To repeat the form alignment routine, enter an N. To begin the print process, enter a Y. Complete either selection by pressing <Enter>.
During the printing and/or laser/microfiche file creation process, the system displays the following message showing the number of statements remaining to be prepared on the screen:
(number) STATEMENTS TO BE PRINTED
Upon completion of the process, the system displays the prompt:
Do you want to reset the transaction file for next month=s processing? (Y/N): [ ]
If you respond with an N followed by <Enter>, the system issues the following warning and returns to the Deposit Account menu:
|
CAUTION: The transaction file must be reset prior to processing next month=s transactions. |
If you respond Y, the system deletes the items printed on statements and begins the restructuring process required to roll forward the balances for the statements printed. The following is displayed:
REBUILDING TRANSACTION FILE - PHASE I
Upon completion of the final phase, PHASE VIII, the system displays the following message along with the time that the processing was complete.
STATEMENT PROCESSING COMPLETE AT (time).
For purposes of scheduling the printing of statements and restructuring of the files after statements, it is recommended that you keep records of the time required for your various statement cycles. After the final message has been displayed, press <Enter> to return to the Deposit Account menu.
STATEMENT NOTES: No files are updated during the preparation and print phases of the Statements program, so it is permissible to stop and restart the program as often as desired until the transaction file restructuring process has been initiated. Once the restructure process has been started, you must recover from backup to restart the program.
During the transaction file restructuring process, users are not able to request the display or printing of customer ledgers. However, the Customer/Account Inquiry function is available.
SEPARATE CYCLES ON SAME DAY: To prepare statements for two or more cycles on the same day but not intermix the statements, use the following procedure. This avoids performing the transaction file restructure procedure more than once.
Indicate that the run is not a restart and request statements for the first cycle.
Upon completion of the print phase, indicate that you do not wish to reset the transaction file.
Request the statement run a second, third, etc. time. Indicate that the run is not a restart, and request statements for the second, third, etc. cycle. If you have more than one printed connected to your system, you may begin the printing of these subsequent cycles from another terminal while the statements from a prior request are still being printed.
Upon completion of each of the print phases for each printer, indicate that you do not wish to reset the transaction file. It is important that this instruction be followed even for the last cycle printed so that you do not reset the transactions for only the last cycle printed.
Request the statement run a final time and indicate that the run is a restart.
Enter a restart account number of all 9's so that no statements actually print.
Request statements for all cycles printed. It is very important that you make no mistake in keying the cycles so that you do not inadvertently reset the transaction for a cycle not printed or skip a cycle that was printed.
Upon completion of the print phase (which does not produce any statements), indicate that you do wish to reset the transaction file.
PRINTING STATEMENTS USING TWO PRINTERS: To use two printers to prepare statements without separating the statements by cycle, use the following procedure.
Indicate that the run is not a restart and request statements for the first cycle.
Request the statement run a second time from a second terminal. Indicate that the run is a restart and enter a restart account number that is mid-way through your statement run. If you request a laser/microfiche file, do not erase the existing file since the run your have already started is in the process of adding records to that file.
When the first print run reaches the starting point of the second run, cancel the first run using the cancel print job instructions.
Upon completion of the print phase requested second, make sure that the first half of the statements have all been printed and then indicate that you do wish to reset the transaction file.
MICROFICHE SEQUENCE DIFFERENT FROM STATEMENT SEQUENCE: To prepare a laser/microfiche file in a sequence different from the sequence used in printing statements, use the following procedure.
Indicate that the run is not a restart and request statements for the laser/microfiche file in the appropriate sequence. You may wish to print a stock-paper list of the statements to use as your reference copy until your microfiche has been prepared.
Request the statement run a second time without requesting the laser/microfiche file. You may do this from another terminal while your first request is still being processed. Indicate that the run is not a restart and request printing on the statement form in the appropriate sequence.
Upon completion of the print phase requested second, make sure that the laser/microfiche file creation run has been completed and then indicate that you do wish to reset the transaction file.
Overdraft notices are printed after all deposit account items have been posted for the day according to the format specified by your bank.
From the Deposit Account menu, enter 41 for Overdraft Notices. The system displays the prompt:
LOAN NOTICE FORMS AND PRESS <Enter>: [ ]
Press <Enter>. The system begins printing the notices and returns to the Deposit Account menu.
SAMPLE
OVERDRAFT NOTICE
The Interest Checks program is provided for closing Christmas, Vacation, and other Club accounts. It can optionally be used to print interest-only checks for other types of accounts.
This program does not actually remove funds from accounts. The printed checks have to be processed as debits to the respective accounts.
The Interest Check program is normally followed by the Check Register program (see Section 4.5.10).
From the Deposit Account menu, enter 42 for Interest Checks. The system displays the prompt:
Check Date: MM/DD/YYYY [ ]
If the date displayed is correct, press <Enter>. Otherwise, backspace and enter the correct date for the checks in the same format. The system then displays:
Enter account type (s) to be included: [ ]
Enter the account types to receive checks separated by commas and press <Enter>. The system displays the prompt:
Enter I for Interest only or B for total Balance: [ ]
Enter the option desired and press <Enter>. The system then displays:
Enter starting check number: [ ]
Enter the starting check number and press <Enter>. Note that the system uses this number for the first test check printed and increments the number once for each subsequent sample check. After a test check has been printed, the system displays:
Is the check form aligned? (Y/N): [ ]
To print an additional alignment form, enter N. Otherwise enter Y. The system begins printing the checks and returns to the Deposit Account menu.
Because no updating is performed by the program, the Interest Check program can be restarted without recovering from backup.
This selection from the Deposit Account Menu has been disabled because all interest reporting functions have been moved to a separate government reporting library. A special booklet of instructions is distributed each year along with the government reporting library for that year. After 1099 records have been created, year-to-date interest figures should be cleared from the deposit account file (see Section 4.4.6).
The Deposit Account system provides the following functions for file inquiries.
- Display customer and
deposit account information on the terminal screen.
- Print or display a
report showing account activity for a particular customer.
- Display the last entry
for a particular customer.
Function Selection
Throughout this section you will be asked to select a particular function from the INQUIRIES portion of the Deposit Account menu. The following example illustrates the INQUIRIES portion of the Deposit Account menu.
INQUIRIES
5. Customer/Account Inquiry
6. Display Ledger
7. Print Ledger
8. Display Last Entry
4.7.1 CUSTOMER/ACCOUNT INQUIRY
The Customer/Account Inquiry displays a specific customer. The system displays customer information, numbers, and balances for requested customer accounts.
Inquiries are made by specifying the customer
number of the desired customer. The system then requests whether data for a
specific account is to be displayed.
NOTE: This procedure is exactly
the same as the Inquiry procedure that is selected as option number 2 from the
Deposit Account menu.
From the Deposit Account menu, enter 5 for Customer/Account Inquiry. After selection of 5, the system displays the prompt:
Customer Number: [ ]
Enter the number of the customer to be displayed. The system displays the information from the customer record.
The system then requests whether the detail for a particular deposit account is to be displayed. The system then prompts:
Account Number: [ ]
To display the detail for a particular account, enter the number. If the number does not exist in the file, the system assumes you want to enter a new deposit account. Refer to Section 4.3.1 for entry of a new deposit account.
This procedure also allows you to process a transaction against the specified deposit account. After the deposit account information is displayed, the system displays the prompt:
Transaction Code: [ ]
To change customers, press <Enter> only. To return to this customer=s CIF display, enter 99 and press <Enter>. To enter a transaction, refer to Section 4.4.3 for a description of transaction entry.
When all inquiries have been made, perform an ESCAPE operation to return to the Deposit Account menu.
The following example illustrates the information displayed on the screen:
SAMPLE DISPLAY HERE
The Display Ledger procedure displays account activity for a particular deposit account.
From the Deposit Account menu, enter 6 for Display Ledger. After selection of 6, the system displays the prompt:
Customer Number: [ ]
Enter the number of the customer to be reported or press <Enter> to request the ledger by account number.
If a customer number is entered and only one deposit account exists for that customer, the first page of the account ledger is displayed on the screen. Otherwise, the system displays the prompt:
Account Number: [ ]
Enter the account number to be reported and press <Enter>. The system displays the first page of the requested ledger. Press <Enter> to view subsequent pages. After the last page has been displayed, the system returns to the Deposit Account menu when <Enter> is pressed.
The following screen is a sample of the information displayed:
PUT SAMPLE SCREEN HERE
The Print Ledger procedure prints a report showing detail activity for a particular deposit account.
From the Deposit Account menu, enter 7 for Print Ledger. After selection of 7, the system displays the prompt:
Customer Number: [ ]
Enter the number of the customer to be reported or press <Enter> to request the ledger using the account number.
If a customer number was entered and that customer has only one deposit account on file, the system begins printing the ledger and returns to the Deposit Account menu. Otherwise, the system displays the prompt:
Account Number: [ ]
Enter the account number to be reported and press <Enter>. The system begins printing the ledger and returns to the Deposit Account menu.
PUT SAMPLE HERE
This procedure allows you to view the last entries posted to the deposit accounts. It is used primarily to determine where you left off in posting items to accounts. Note that this display includes only posted items and not those items entered to proof that have not yet been posted.
From the Deposit Account menu, enter 8 for Display Last Entry. After selection of 8 the system displays the last entries. The following screen is a sample of the display.
PRINT SAMPLE OF LAST ENTRIES
After viewing the entries, press <Enter> to display the Deposit Account menu.
The Deposit Account system includes a set of utility procedures that are used to maintain the accounting system files. These utility programs include procedures to:
o Display status information
about any desired data file.
o Compress a file which
rearranges the data space used by a file, thus reclaiming any unusable
areas.
o Delete zero balance deposit
accounts.
o Initialize and rebuild a
lookup file that is used by the system for maintaining customer and account
number.
o Change the year-to-date
interest.
o Calculate loan or interest
rates.
This section describes the steps necessary to complete the above functions.
Function Selection
Throughout this section you will be asked to select a particular function from the BANCADO Utilities menu. The BANCADO Utilities menu is selected from the UTILITIES portion of the Deposit Account menu. The following is an example of the UTILITIES portion of the Deposit Account menu:
UTILITIES
96. Change Bank Control
97. BANCADO Utilities
98. Just Ask
99. Change Applications
This section describes selection 97. Selection 96 is described in Section 4.3. Selection 98 calls up the JUST ASK system, which is used to generate reports; the JUST ASK system is documented in the CADO JUST ASK User=s Manual. Selection 99 causes the system to display the BANCADO main menu.
The following is an example of the BANCADO Utilities menu.
SAMPLE BANCADO UTILITY MENU
Selection 98 and 99 are not described here. Selection 98 calls up the JUST ASK system. Selection 99 causes the system to display the BANCADO main menu.
This utility produces a display of information about any desired data file. This information can be used to learn whether the file needs to be compressed or resized. In exceptional cases, the information may also indicate that data records have been lost.
A file status table, with sample figures, is shown in Figure 4.18.
SAMPLE FILE STATUS
The DEFINED section of the table lists numbers that were specified when the file was defined, as follows:
# RECORDS Maximum number of records keys in the file.
KEY LENGTH Search key length.
AV REC LENGTH Average record length.
FILE START File start location (drive and track).
FILE END File end location (drive and track).
The ACTUAL section of the table indicates the current condition of the file as follows:
NORMAL Number of normal records in the file
OVERFLOWED Number of overflowed records
OVERFLOW Number of overflowed records.
DELETED Number of records deleted.
AVAILABLE Amount of space available in the file, including the number of available record keys (COUNT) and number of available bytes. AVG is the average number of bytes in each record if the total number of available records keys are defined in the available space.
Note that the ACTUAL figures for a sort file are meaningless; in any case, a sort file should never require maintenance.
The ACTUAL data in the File Status report is used to determine whether or not a file needs compression, is approaching full capacity, or contains damaged data. A file needs compression if the numbers OVERFLOWED and/or DELETED bytes are large compared to the AVAILABLE bytes.
A file is approaching full capacity if, immediately after compressing the file, the AVAILABLE count and bytes are small compared to the NORMAL count and bytes. The AVAILABLE count gives the maximum number of records that can still be added to the file.
An overflow occurs when an attempt is made to write a record on a track and there is room for the key portion, but there is not room for the data portion of the record. The key, which is marked as an OVERFLOW record, points to the OVERFLOWED record, which is placed on the next track with room for both the key and data portions of the record.
A file contains data that has been damaged if the OVERFLOWED and OVERFLOW counts are not equal. If these counts are unequal, data has probably been lost from the file.
From the Deposit Account menu, enter 97 for BANCADO Utilities. From the BANCADO UTILITY menu, enter 1 for Display File Status.
The screen displays a blank file status table and waits for you to enter a file number. Enter the number of the desired file, as follows:
0 System
Control File
1 Customer Information File
2 Commercial Loan File
3 Installment Loan File
4 Installment Loan Earnings File
5 Certificates of Deposit File
6 Deposit Account File
7 Transaction File
8 Name Lookup File
9 Lookup File
The system fills in the file status table for the specified file. If the system completes only the upper half of the table, the data diskette that contains the file is not mounted correctly.
After viewing the file status, press <Enter> to request the status of another file, or perform an ESCAPE to return to the Deposit Account menu.
Routine file editing procedures, such as deleting records or changing record lengths, can create temporarily unusable storage area in a data file. As a consequence, the time required to retrieve records and the likelihood of overflowing the file are increased. The Compress File utility rearranges data space, reclaiming most of the unusable area.
The Display File Status utility is available to indicate whether a file needs compression. However, there is no harm in compressing a file which does not actually need it, and compression is generally run as a routine maintenance procedure. Some application programs may compress files automatically.
File compression is one of the operations that can damage data if interrupted by the operator or by hardware failure. It is best to obtain a backup immediately before compressing a file.
NOTE: The Sort file, File 9, cannot be compressed.
From the Deposit Account menu, enter 97 for BANCADO Utilities. From the BANCADO UTILITY menu, enter 2 for Compress File.
The system displays:
FILE COMPRESSION
ENTER FILE NO. [ ]
Enter the number of the desired file.
The system compresses the file. Upon completion, the system displays:
DONE
Press <Enter> to use this utility again or perform an ESCAPE to return to the Deposit Account menu.
This program is provided for your BANCADO System Support representative and should be used only as directed.
This program is provided for your BANCADO System Support representative and should be used only as directed.
4.8.5 DELETE BY RECORD SHOWING KEYS
This program is provided for your BANCADO System Support representative and should be used only as directed.
This program is provided for your BANCADO System Support representative and should be used only as directed.
This utility deletes closed out accounts. Because the user is responsible for determining the amount of time that an account is to remain on file, the system does not automatically delete closed accounts. Accounts are deleted by date; that is all deposits that were cashed prior to a specified date are deleted.
Note that deleting closed accounts does not affect the preparation of a customer ledger. The customer ledger is prepared using the customer transactions only.
From the Deposit Account menu, enter 97 for BANCADO Utilities. From the BANCADO UTILITY menu, enter 13 for Delete Zero Balances. The systems displays the prompt:
DELETE DEPOSIT ACCOUNTS CLOSED ON OR BEFORE: [ ]
Key the date of the newest closed account to be deleted from the file. The system automatically deletes all deposit accounts that were cashed (closed) or paid prior to the specified date.
The system then automatically compresses the appropriate account file. The system displays the number of accounts deleted followed by the current date.
Press <Enter> to display the Deposit Account menu.
This utility is used to initialize and reconstruct the Lookup Files, Files 8 and 9. This utility is used only if the size of the Lookup File is increased.
The Lookup Files contain records for each customer and each account. The records in the files are sorted by customer number and account number.
From the Deposit Account menu, enter 97 for BANCADO Utilities. From the BANCADO UTILITY menu, enter 20 for Build Lookup File.
The system automatically initializes and rebuilds the files. Upon completion, the system returns to the Deposit Account menu.
|
|
This utility provides a list of unused account numbers in the Deposit Account system.
From the Deposit Account menu, enter 97 for BANCADO Utilities. From the BANCADO UTILITY Menu, enter 21 for Available Account List. The system displays the screen:
AVAILABLE ACCOUNT LIST
Enter Starting Number: [ ]
Enter the starting number and press <Enter>. The system then displays:
Enter Ending Number: [ ]
Enter the highest number desired on the list and press <Enter>.
The system produces a list of all the numbers in the range requested and prints the name of the customer for each number in use. When the system starts to print the report, the Deposit Account menu is displayed on the screen.
PUT SAMPLE AVAILABLE ACCOUNT LIST HERE
This program is to be used only by BANCADO System Support personnel in updating files from one version of the BANCADO software to the next.
This program is used only at the time balances are first entered into the BANCADO Deposit Account system. This program must not be used to change balances after conversion because the amount entered is added to both the balance forward and to the current balance fields of the Deposit Account file.
From the Deposit Account menu, enter 97 for BANCADO Utilities. From the BANCADO UTILITY Menu, enter 31 for Balance Conversion. The system displays the screen:
SAMPLE SCREEN HERE
Enter the customer number if it is known and press <Enter>. If the customer number was entered and there is only one deposit account on file for the customer entered, the system displays the account information and proceeds to the Balance prompt. Otherwise, the cursor is positioned to the Account Number prompt. Enter the account number and press <Enter>.
To accept an amount as correct, simply press <Enter>. To change an amount, backspace over the amount shown, if any, and then press <Enter>.
After the Year-to-date Interest Paid field has been accepted or changed, the system returns to the Customer Number prompt for the next entry. To terminate the procedure and return to the Deposit Account menu, perform ESCAPE.
Normally, the Change Year-to-date Interest program is used only during conversion.
From the Deposit Account menu, enter 97 for BANCADO Utilities. From the BANCADO UTILITY Menu, enter 32 for Change Year-to-date Interest.
The system displays the following screen:
SAMPLE SCREEN HERE
Enter the customer number if known and press return. If the customer number was entered and there is only one account on file for the customer, the system displays the account information. Otherwise, the cursor is positioned to the Account Number prompt.
Enter the account number and press <Enter>. To accept an amount as correct, press <Enter> only. To change an amount, backspace and make the correction. For the prompts requesting a net change, the amount entered may be preceded by a minus sign to decrease the figure on file. To leave a field unchanged, press <Enter> without an entry.
After the Year-to-date Interest Paid field has been accepted or changed, the system returns to the Customer Number prompt for the next entry. To terminate the procedure and return to the Deposit Account menu, perform an ESCAPE.
This utility allows you to use the BANCADO CRT as a five level adding machine.
From the Deposit Account menu, enter 97 for BANCADO Utilities. From the BANCADO Utilities. From the BANCADO UTILITY Menu, enter 40 for Adding Machine. The system displays the prompt:
ADDING MACHINE - PRESS <Enter> TO TOTAL
Enter the amounts to be added or subtracted without decimal points and press <Enter> after each. Numbers to be subtracted are entered using the minus sign before or after the numerals. After each entry, the system displays the number with a decimal point two places to the left of the last digit entered. For example, 100 is displayed as 1.00.
To obtain a total, press <Enter> without making an entry. To clear the second, third, fourth, and fifth level totals, press <Enter> two, three, four, or five times consecutively.
To return to the BANCADO UTILITY Menu, perform an ESCAPE.
This procedure is provided for your BANCADO System Support representative and should only be used as directed.
This utility is used to change the system time in the event that it was incorrectly keyed at the start of the day.
From the Deposit Account menu, enter 97 for BANCADO Utilities. From the BANCADO UTILITY Menu, enter 97 for Change Time. The System displays the time:
Enter Time: [ ]
Where hh is the current hour and mm is the current minute. Backspace over the time displayed, key the correct time, and press <Enter>. The system corrects the system time and returns to the BANCADO UTILITY Menu.
The Compute Interest program is provided as a tool to the banker in determining in advance interest payments to an account.
From the Deposit Account menu, enter 97 for BANCADO Utilities. From the BANCADO UTILITY Menu, enter 41 for Compute Interest. The system displays the following screen:
PUT SAMPLE SCREEN HERE
Enter the rate in 99.99999 format and press <Enter>.
The system date displays. To edit, backspace and enter the date.
Enter the transaction amount you wish to calculate interest on. The maximum amount is 999999999.99.
The system displays the interest for the period of time specified and for the total account entered thus far. To continue with the same account, press <Enter> and the system returns to the Update Through Date prompt. To calculate the interest for a different account, perform a CANCEL and the system returns to the Interest Rate prompt. Perform an ESCAPE to return to the Deposit Account menu.
This utility is provided as an interval timer.
From the Deposit Account menu, enter 97 for BANCADO Utilities. From the BANCADO UTILITY Menu, enter 42 for Stopwatch. The system displays the screen:
PUT SAMPLE HERE
Press <Enter> to start the timer and again each time you wish to see the time interval elapsed. The time is displayed as hours : minutes : seconds : and hundredths of seconds. The timer continues to run until you perform an ESCAPE.
![]()
END OF DEPOSIT ACCOUNT SECTION